The Properties Menu
- Ben Mazza
- Mar 6
- 6 min read

The properties menu is found on the right hand of the screen when selecting any item in the 3D editor.

The Properties Menu in Sagenverse is your central hub for customizing and controlling the appearance, behavior, and interactivity of objects within your immersive experiences. Whether you're adjusting the scale of a model, setting up interactions, or styling your exhibit, the properties menu brings powerful tools into one intuitive interface.
🧰 Simple Transformation Controls
These basic tools allow you to manipulate objects quickly and easily:

Rotate: Rotate an object on it's "up" axis for the floor and "out" axis on a wall or surface
Quick Rotate Buttons: Use preset 90° rotation buttons for fast adjustments the up axis
Scale: Adjust the size of an object proportionally on all axis
Mirroring: Instantly flip objects across horizontal or vertical axes (Note: it will flip textures as well).
Advanced Toggle: Open up the expanded transformation menu options where you can modify each dimension of translation, rotation and scale for the object.
🧭 Advanced Transformation Controls
These features provide precision for expert users and complex layouts - all values are world-space coordinate based


Translation Menu: Manually input exact position values on the X, Y,and Z Axis
Rotation Menu: Rotate the selection on the X,Y and Z Axis
Scale Menu: Apply uniform or non-uniform scales on X,Y and Z Axis
Placement Rules: Toggle special rules for object manipulation
Surface Placement: If enabled, make all of the surfaces on the object work as a placement surface
Preferred Alignment: When placing items in the space, the system will assist in orienting the object based on the selected rule.
Up Aligned - The object will rotate along its up axis (typically the Y axis) - best for objects on the floor
Forward Aligned - The object will rotate along it's out axis (typically the Z axis) - best for objects on walls
None - The object will not have it's rotation modified with placement - handy if you've applied a custom rotation
Reset: Revert the object back to it's base scale and rotation, and placement rules - it'll keep it's current position in space.
Duplication: Create one or multiple copies of the selected object.
Delete: Destroy the current selected item (Pressing delete or backspace will also do this)
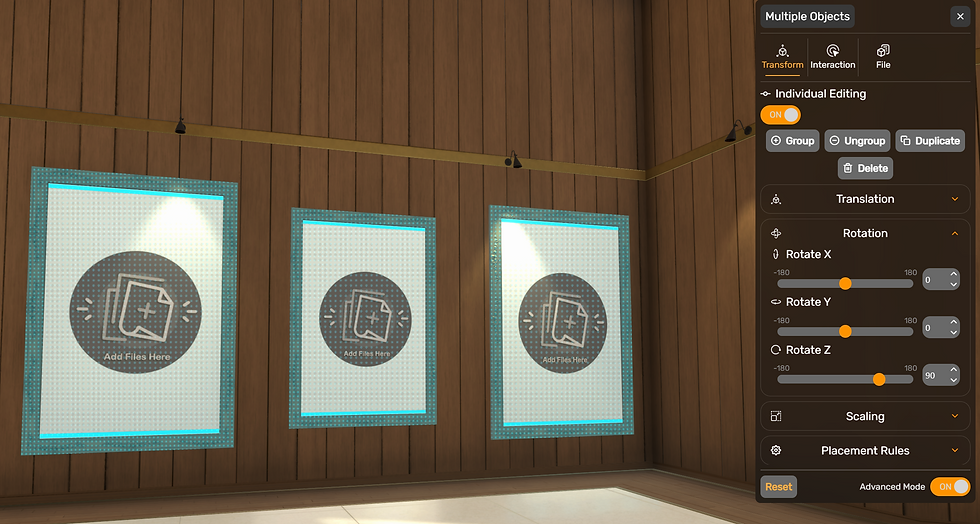
Grouping (when selecting multiple items) : Combine multiple objects into a single group for unified transformation and organization.
Ungrouping (when selecting a group): Break-up a group of items into their isolated pieces.
Individual Editing (when selecting multiple items) When toggled on - transformations and other edits are applied to each object in the selected group, not the group itself - handy for rotating multiple frames from portrait to landscape.

Sorting Layer: (for loose files) When a file is placed upon a wall the sorting layer decides which file draws over another when stacked on a wall) - higher number is shown first.

A loose image with a sorting value added in the advanced transform control
🎨 Style Settings
Customize the visual identity of objects in your scene with an interactive color management system.


Color Picker: Select the color you'd like to customize in the dropdown list, then drag the cursor and sliders on the interactive color picker to change it. Note: some items may not have this option.

RGB Input - Input your color value of 0-255 for each input box Red, Green, Blue

Hex Color - Input a color hex code (#000000)
Copy - The quick copy button is next to the hex toggle to enable a quick grab of your hex value for easy use in applying to other areas of your room.
Note - Colorization of multiple items is possible by having a group of objects selected. It will attempt to match color groups between objects as best as it can
💡Lighting Settings
Some Items will offer lighting options for you to customize.

Light Color: The color of the light
RGB: The color of the light in RGB value (0-255)
Hex Color: The color of the light in hex code (#000000)
Light Intensity: How bright the light source - 0 is off
Light Range: The distance (in meters) of where the lighting effect will reach in the space (0 is off)
Spot Angle (Spot Only): The diameter of the spot light cone (0.01 - 179) larger number means wider light coverage
Hardness (Spot Only): The amount of feathering on the edge of the spot light cone - (0-1) 1 is completely hard-edged
Light Enabled: A toggle switch that turns the light on and off - it is on by default
⚙️ Interaction Settings
This menu handles what interactive behaviors the object has enabled:
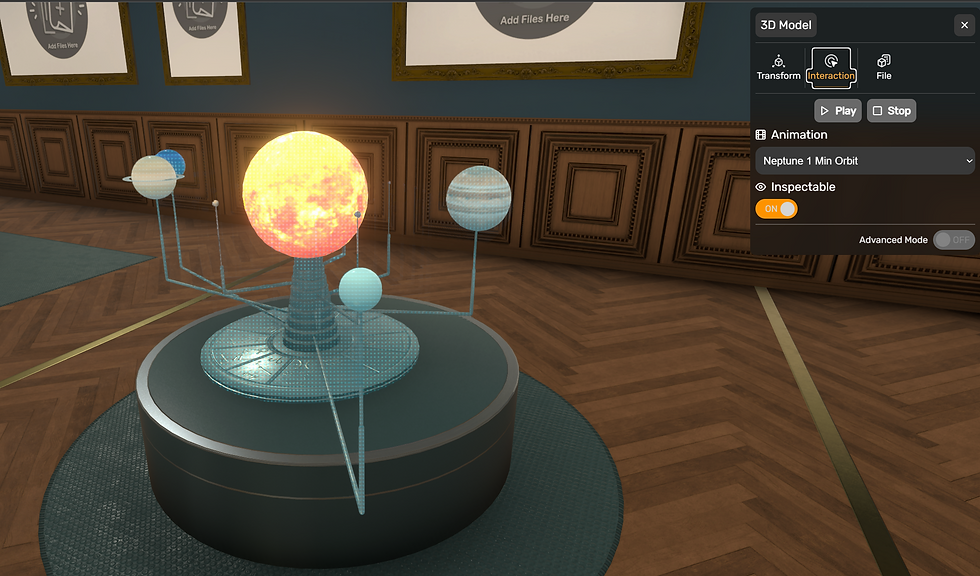
Inspectable: When toggled on, this object can be inspected by visitors to the scene.
Play and Stop Buttons (Animated Models): - plays and stops any preview animations playing on the object.
Animation (Animated Models): Dropdown that sets what animation you want the model to play.
📝 Text Settings
When editing a Note or Text Object - The transform menu offers a text editing tab

Main Text Body:
The main body of the text tab allows for typing or pasting your content into the text field.

Formatting buttons: Provide common formatting styles - Bold, Italics, and Underline. Reset will clear all formatting. To apply the effect, drag select the text you want formatted, or toggle the button prior to typing. The cancel button clears all styles
Alignment Buttons: Align the text within the label frame.
Font Size: Changes the size of the characters used on the text object - automatically resizes the frame to fit.
Background X: Changes the size of the text frame on the X axis
Background Y: Changes the size of the text frame on the Y axis
Note: if you manually change the background sizes - auto-sizing the frame will be disabled.
Font Selection: Dropdown menu to change the font used for the text frame.
Auto-Size Enable/Disable Auto-sizing the text frame (on by default)
📁 File/Slide Show Settings
Many furniture pieces offer slots for holding and presenting files - if they do the file tab will appear
Each slot shows up as an accordion menu item that can be expanded to reveal the options for each file.

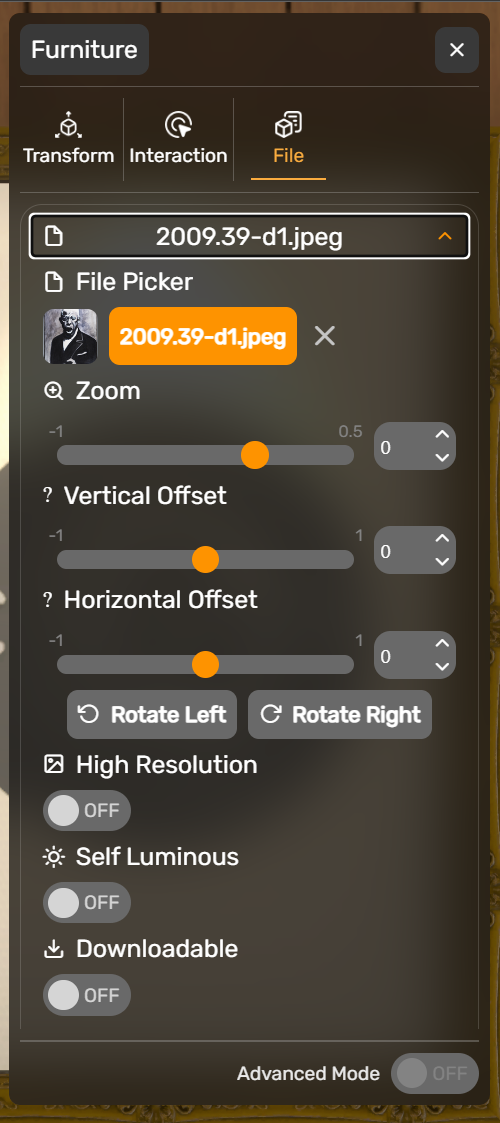
File Picker: The file picker opens up a pop-up menu offering you a way to select a file to place within the file slot. Pressing the "X" button clears out the currently assigned file.
Zoom: The Zoom controls enlarges or shrinks the image within the file slot's frame
Vertical Offset: Shifts the image within the slot's frame vertically
Horizontal Offset: Shifts the image within the slot's frame horizontally
Quick Rotate Buttons: Quickly applies a 90 degree rotation to the image within the frame left or right
🔍 File Properties
Each File also offers a set of properties that can be customized

High Resolution: When enabled uses a higher resolution preview image in the 3D scene - perfect for large or detailed images. (Note: using this in excess can reduce the accessibility and stability of your scene)
Self-Luminous: When enabled the image does not use the in-room lighting and instead takes on the look of a LCD screen.
Downloadable: When enabled allows visitors of the scene to download a copy of the file (off by default) - (Note: please do not offer downloads to files you do not have proper copyright for)
Interactable: When enabled allows visitors of the scene to inspect the file in detail. Disabling inspection is useful for files that are used as decoration in the scene.
Player Collision (3D Models Only) - When enabled, blocks the guest from passing through the object
Open in New Tab (URLs only) - When enabled opens the website in a new browser tab (on by default) - when disabled it will load the URL into the mini-browser.


Note: (Urls may not always work within the mini-browser due to their specific security settings - any site that can be embedded will work)
