Using the 3D Editor
- Ben Mazza
- Mar 6
- 8 min read

Updated: Apr 29

The Sagenverse 3D Scene Editor gives creators full control over their 3D design and arrangements. Whether you're building an educational exhibit, virtual project space, or interactive tradeshow display, the editor's intuitive tools and robust features make it easy to compose dynamic 3D environments. This guide covers the core functionalities you'll use to design, customize, and publish your projects.
🗂 Palettes: Files, Furniture, Notes, and Portals

The editor includes expandable Palettes that help manage your scene content. They are located on your main toolbar.
📁 Files Palette:
Displays your imported media—images, videos, documents, and 3D models—that can be placed directly into the scene.

Navigation within the files palette helps get you to the different file sources you can use in your project.
Back to Drives - Takes you to your org drives it also enables you to return to the current sagen drive Note- You cannot add files from other sagen-drives to your current sagen project - use org drives to share files across projects
Breadcrumbs - When navigating within folders, a breadcrumb list of folder names will start to appear - clicking on a name of a folder will take you to that folder view. The sagen project name is the root folder.

Adding a File to Your 3D Sagen Scene: To add an instance (or copy) of the selected file to your scene, simply drag it from the file menu into the scene where a 3D representation of the file will appear.

Sagen Folders/Files:
When working within a Sagen scene it automatically creates a "sagen drive" for the project. The files interface separates this drive into folders and loose files.
New folders are created by pressing the New Folder button.
Folders can be opened by double clicking them
Folders (along with their contents) can be deleted by using the right click menu and pressing delete.
New files can be uploaded to the main drive or within any folder by pressing the Upload Button
You can edit file metadata by right-clicking and selecting Edit Metadata
To see the complete file name - hover your cursor over the thumbnail
Org Drives:
Org drives or organization drives are CMS directories available in ALL of your sagen projects. These enable the same content to be used across several different projects saving you from uploading duplicates of commonly used assets. Perfect for items like logos, common documents and 3D models.

Org Drives can be created from within any Sagen or from the storage tab on the dashboard.
Org Drives can contain both folders and loose files
You can learn more about file management here
🛋️ Furniture Palette:
Sagevnerse provides a curated library of prebuilt 3D objects such as tables, pedestals, signage frames, and display cases to add to your Sagen project. There hundreds of objects available!


Adding Furniture to Sagen Scene: To add a piece of furniture to your room project, simply click and drag it from the menu to anywhere in the room. It will load a copy of the model to be placed within the space.
Search Furniture: Type in a search term or keyword to locate a specific item within the collection.
Press the "X" to clear your current search and reset the list
Choose Category: Filter the list of furniture choices from a list of categories
Select All to return to the full list of furniture
🗒️ Notes Palette: Add sticky notes, wall labels and simple documents to the scene.


Sticky Notes: Small colorful notes that can be stuck to almost anything

Labels: Larger decal text great for signs, labels and other organizational needs

Documents: A simple document that enables longer form writing to be organized and stored within your Sagen scene. Great for exhibit placards, paragraph notes and other longer form writing needs.
🚪Portals (beta)
Portals enable linking of sagen rooms using special 3D objects.

Adding a Portal
Open the portal palette and drag and drop a link to one of your Published Rooms.

Modifying The Portal Properties

From the properties menu, select interaction to manage the portal's linked location.
Use the dropdown menu to select the destination sagen.
Click the travel button to travel to the selected sagen.
Styling Portals
Portals can be further customized with the style tab.

Change the angle of the room view by using sliders - this helps get the perfect view for your guest.
Use the custom model dropdown to select a different 3d object that links your sagen.
More Customization Details
For More details on customizing Files, Furniture, and Text Objects - Check out this article
Outline View (beta):
Pressing the outline button, will open a list of all of the projects elements organized by type (files, furniture, labels, portals and groups)

Clicking on any item in the list selects it in the room - pressing "F" will move the camera to focus on the object.
You can search for an object by name
Clicking on the refresh button will refresh the outline view
👷Placement editing and Arrangement in 3D space
The Sagenverse editor offers a variety of tools and techniques to help you quickly assemble 3D layouts with ease and creativity. As you get going you'll soon discover a workflow that enables you to flesh out your ideas seamlessly.

Drag and Drop File Frames

Many of the furniture models available in the collection offer a built in file frame. These file frames can be easily recognized when in the building view as they will display a drag and drop icon helping you see where you can drag and drop your files into them.
Note: The furniture category customizable offers many of these types of furniture models.
Moving and Placing objects

Any object can be selected within the 3D editor view by clicking on with your left mouse (or primary click action). Once selected, objects can dragged by the mouse or scratch pad and will automatically try to snap to surfaces like walls, floors, and other object surfaces (if the object is configured for collision).
Selecting multiple objects

Multiple objects can be added and removed from a selection by holding down Shift and clicking on objects on them. Any number of objects can be selected this way, enabling them to be moved as a temporary group, or bulk applying settings from the transform menu.
Grouping/Ungrouping Objects

After making a selection of more than 1 object you are given the choice to group your current selection, converting it from multiple objects, to a single object. This is useful for when you want to move or duplicate a collection of items to quickly populate your sagen scene.You can group/ungroup objects by using the transform menu or pressing shift+g (group) and shift+alt+g (ungroup)
Linking Objects (stacking and attachment)


When placing objects upon other objects a linking event happens automatically. Whether the objects are placed upon the top or sides or bottom of the root object - it will connect the objects via a link represented by the orange selection effect.
Moving Linked Objects: When a object is linked to a root object that object is moved along with the root object. If the linked object is moved, it does not affect the root object. These links can be combined where a nested series of objects can be created.
Un-linking Objects:

Example - A table with equipment and decorations is created. Where the equipment and decoration were placed on the table. When the user selects the table, they'll also select and move the linked (orange objects)
Note - Linking can happen on several levels - example - Food upon a plate that's placed up a table.
Quick Duplicate

Quick duplication can happen via a hotkey command (shift+d) or by holding down ALT and dragging the new copy off of the selected object.
Interactive Transform Gizmos


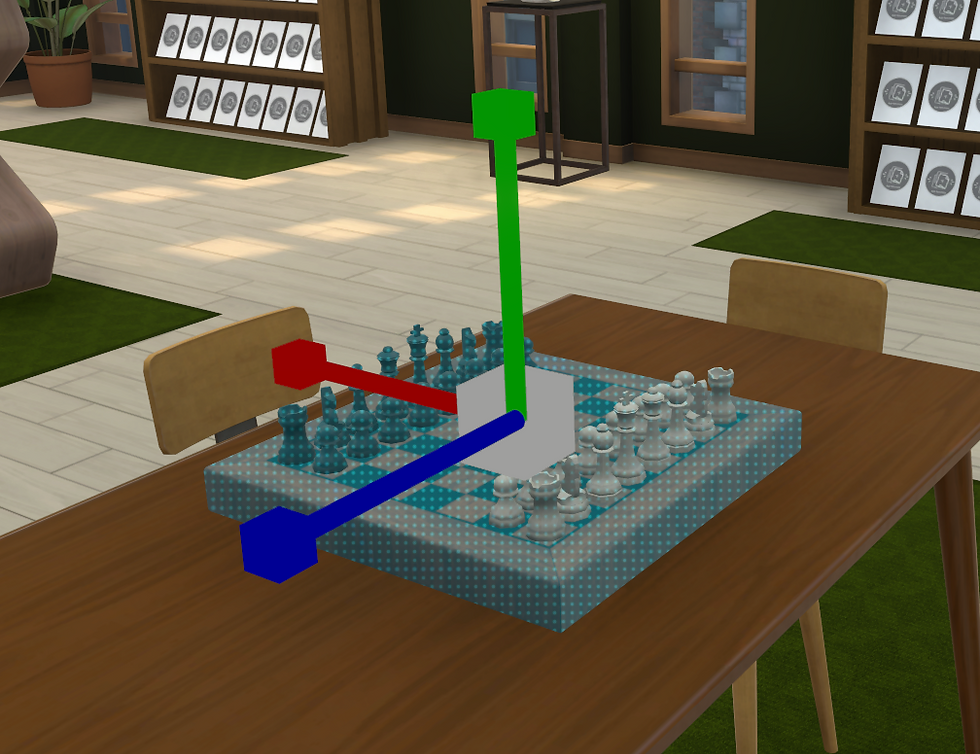
Interactive transform gizmos offer a direct and interactive way to manipulate the position, rotation and scale of a selected object or group.
You can enable and disable these gizmos by pressing the "T" key when an object is selected. These gizmos also appear when an object has it's advanced transform menu settings enabled. When the gizmos are enabled, pressing the following buttons will change the modes. Press 1 - Translation - Drag an arrow to move in single direction or one of the squares to move in 2 axis vertical or horizontal.
Press 2 - Rotation Drag one of the hoops to rotate on that axis.
Press 3 - Scale Drag one of the boxes to apply a non-uniform scale to any axis. Drag the middle box to scale the whole object uniformly.
🏠 Sagen Properties
The sagen properties menu provides access to key settings for your sagen scene.

Set Start Location: Pressing this button will take your current camera position and set it as the perspective for where visitors will enter your scene. This will also set the perspective of the scenes loading image. Room Color Picker: Many of the scene templates offer a number of customizable colors for walls, trim and other elements like lighting. Clicking on any of these swatches will enable you to change these values using either the color picker, RGB or Hex Color inputs.
Lighting Options:
Lights Emissive Power - This setting drives the strength of the selected room lighting group. Some scenes offer a number of lighting groups that can be customized. A value of 0 turns the room lights off.
Tone mapping & color grading- The tone mapping section provides a customizable filter for how the scene looks. This enables several creative options for changing the look of the experience.

Lens and Lighting - These options control how strong the blooming effect is within the scene.
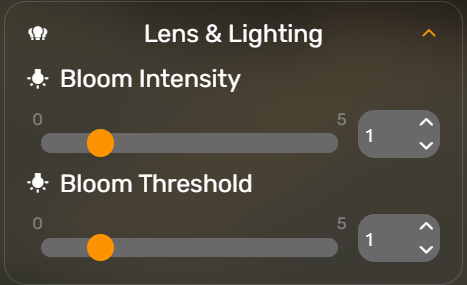
Bloom Intensity - how bright and noticeable the bloom effect is higher = more

Bloom Threshold - The level of luminance needed to achieve a bloom effect - the lower the value the more items will bloom

Previewing your Room
You can test out your room by using the Preview Mode. Previewing puts your project in guest viewing mode. Meaning you'll experience what any guest to your space will experience. This is especially useful for testing your creations, and finding ways to improve the overall quality of your project.

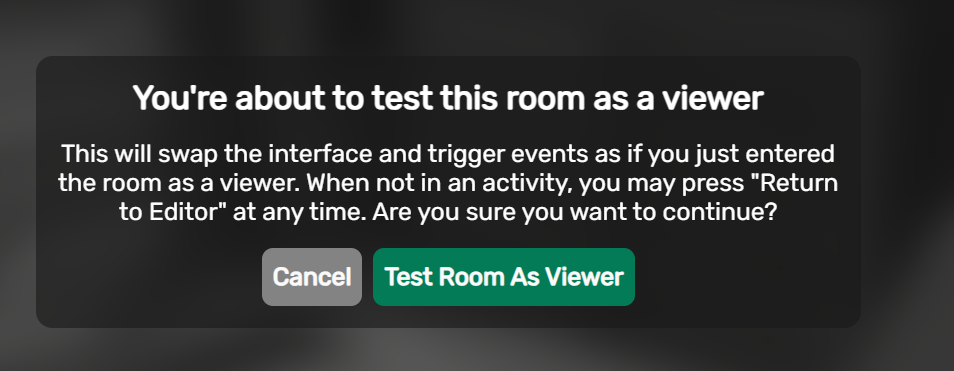

While in preview mode you'll use a different interface - the guest interface. Exit - leaves the preview mode
Share - opens the share pop-up (if the room is published)
Quality - Toggle's low and high res views to help performance
Mute - Mutes audio toggle
Collection - View a list of all interactive objects in the project
Help - Shows the controls and navigation tips.
Back to Editor - Exits preview mode and returns you to the editing mode.

